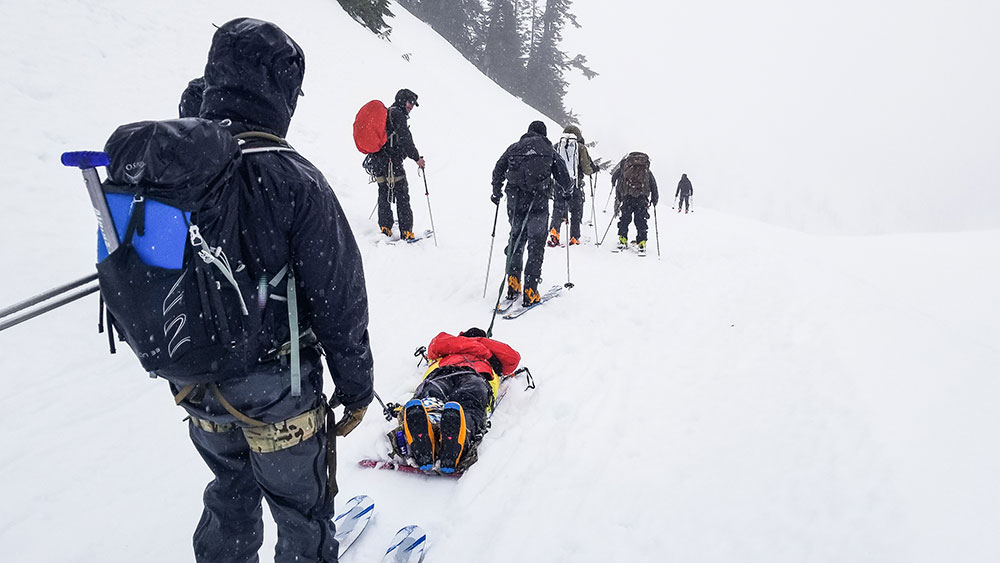
Single Burial Avalanche Rescue
Single Burial Avalanche Rescue
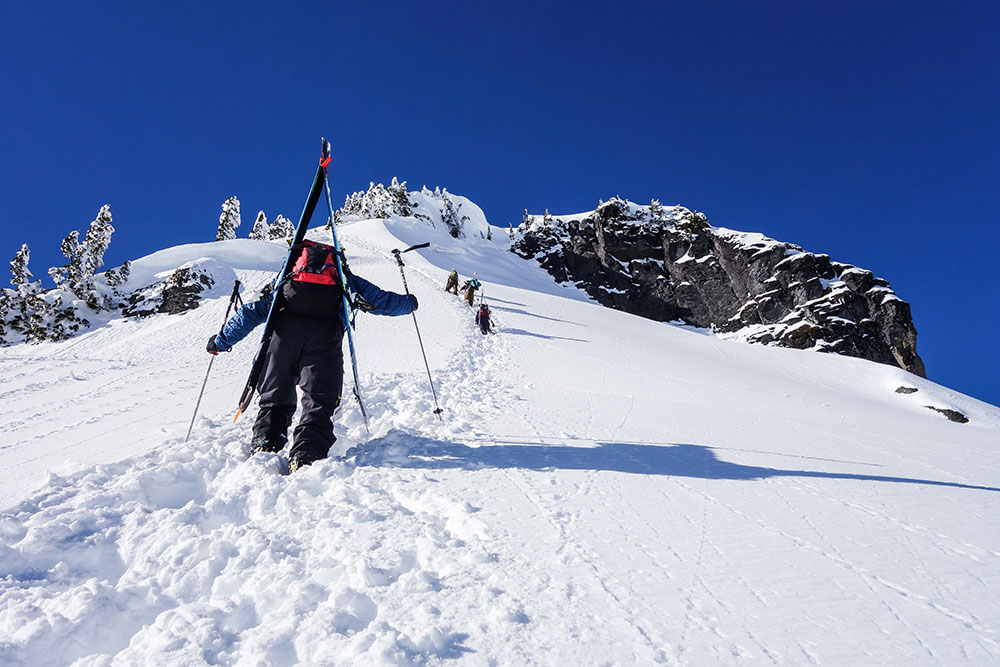
Obviously, the best way to avoid a rescue is to avoid the avalanche all together. Take an Avalanche Course to be proactive and learn how to avoid avalanches. That said, even the most trained professionals can still make mistakes, so everyone traveling in the backcountry should understand how to execute a rescue. At the least, you could help save someone else’s life. Below are the steps to follow if ever you need to perform an avalanche rescue of a single victim.
Avalanche Rescue Checklist
Step 1. (You’re number one). STOP! ASSESS SAFETY! ENSURE NO FURTHER HAZARD
-Risk of second avalanche?
-Hangfire?
-Move to defined safe location
Step 2. CHOOSE A LEADER
-Delegate Tasks
Step 3. HEAD COUNT
-How many missing?
Step 4. CALL FOR HELP
-Others nearby who can help?
-(911) Location, nature of emergency, name, # in group, # missing
Step 5. SWITCH ALL TRANCEIVERS TO SEARCH MODE
-Check that no tranceivers are transmitting
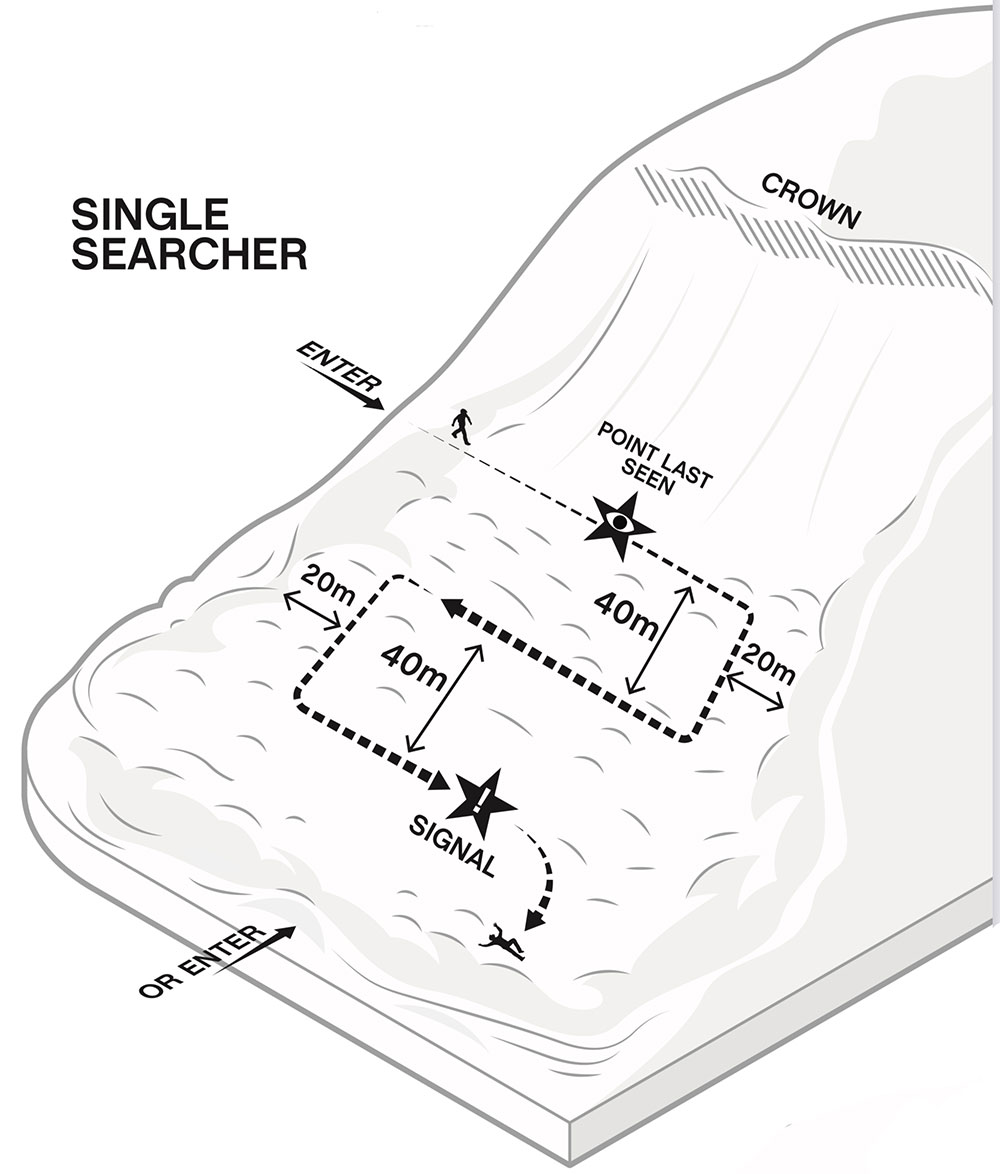
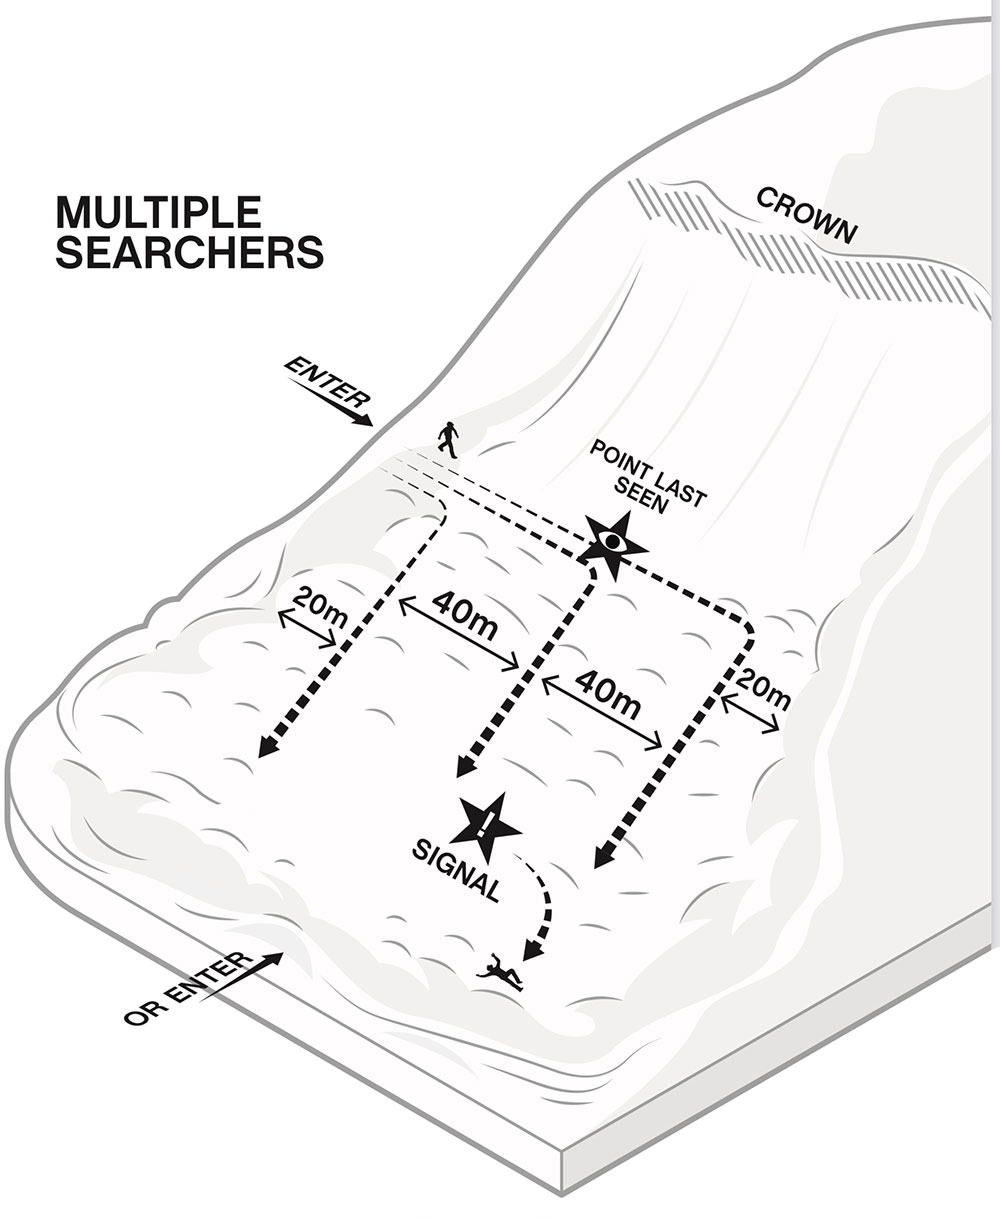
Step 6. DETERMINE WHERE TO SEARCH
-Below point last seen
-In line with visual clues
-Areas of debris, especially terrain traps
Step 7. SEARCH FOR VISUAL CLUES
-Enter debris from side or toe of path
-Search strips 40m apart (About 40 strides)
Step 8. YELL TO OTHERS WHEN YOU FIND A CLUE OR RECEIVE A SIGNAL
-Pull clue out of snow and lwave on snow surface
-Put marker in the snow where you begin to follow signal
-Call to other searchers not following signal to assemble probe and shovel
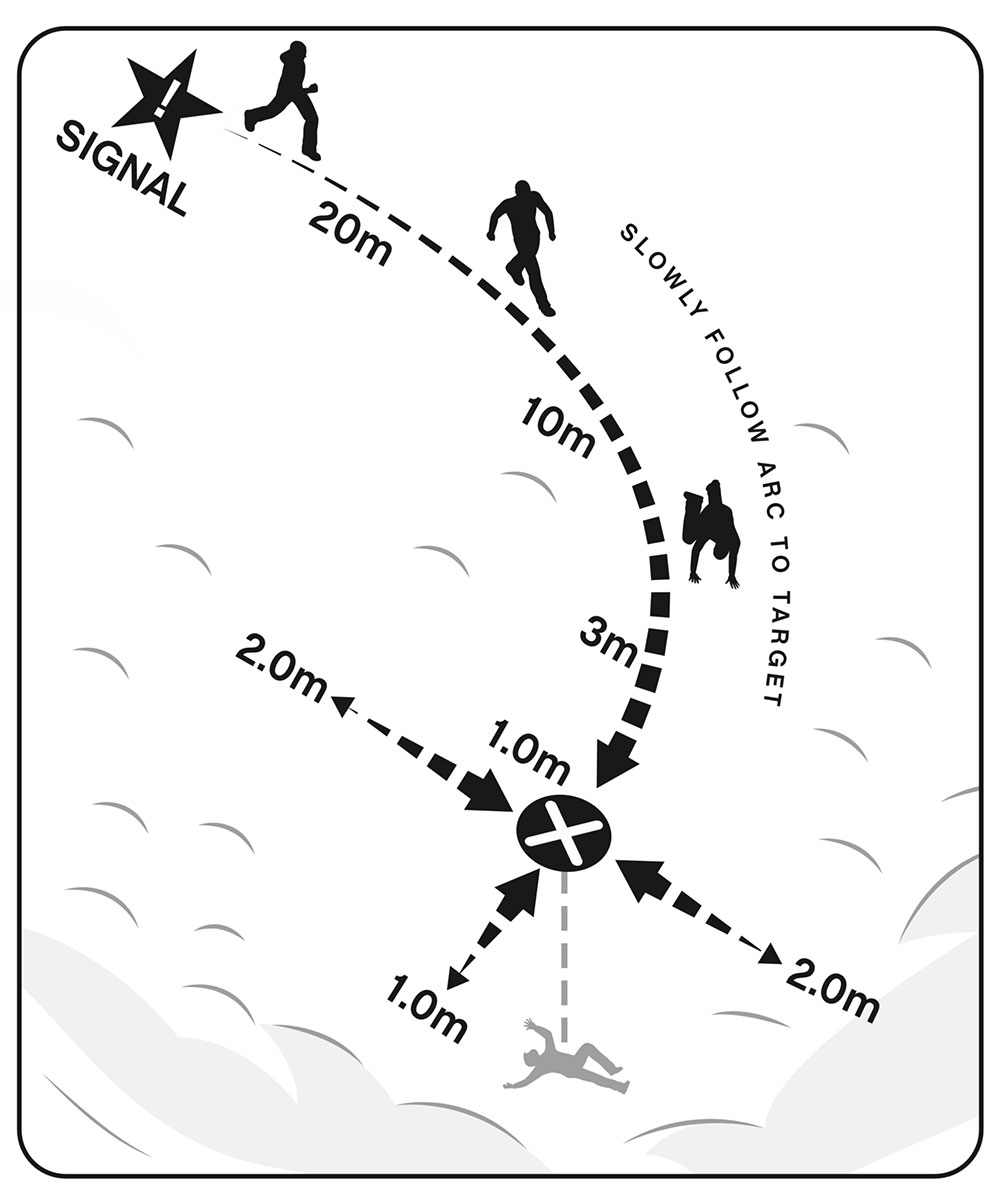
Step 9. FOLLOW SIGNAL TO BURIAL AREA
-Slow and precise as you approach 10m
-Keep tranceivers near the snow surface during final approach (Crawling at 3m)
-Around 5m, place a marker on the snow that points along the approach trajectory
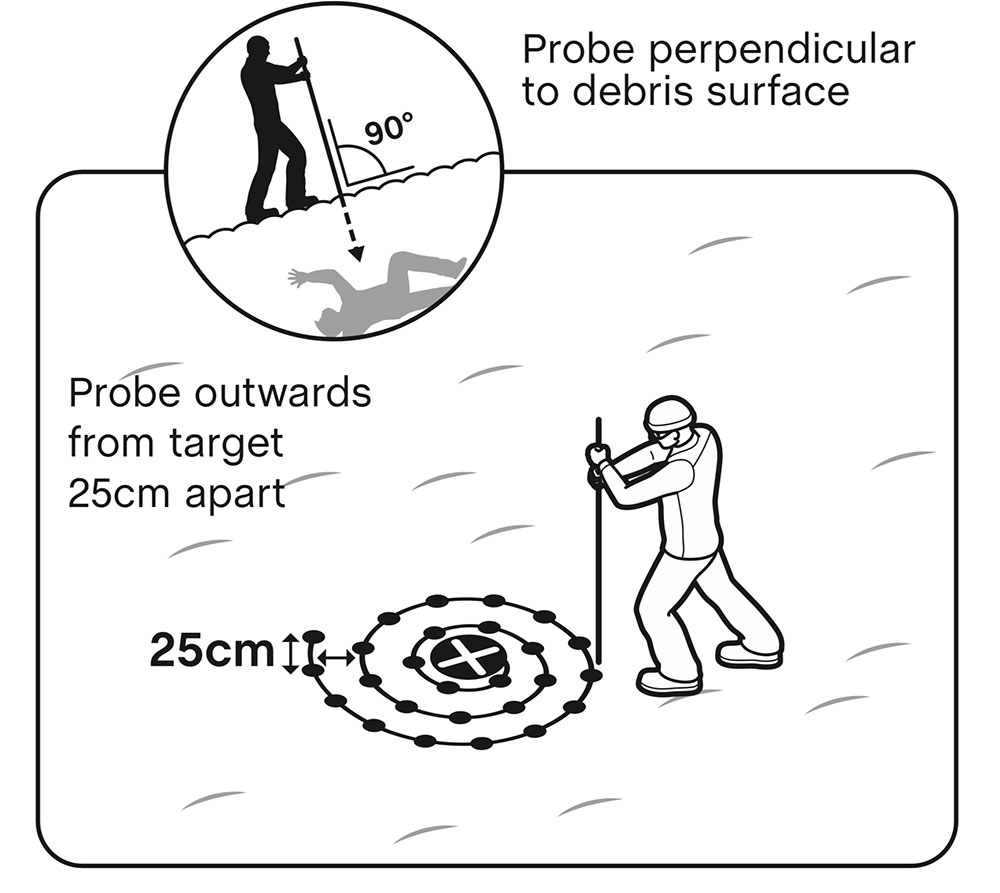
Step 10. LOCATE BURIAL WITH TRANCEIVER AND PROBE
-If possible, 2nd searcher PROBES LIKELY BURIAL AREA in front of tranciever searcher’s trajectory until closest signal located
-Locate the closest transceiver signal by bracketing ahead/behind and to the sides, maintaining consistent transceiver orientation
-Pinpoint using the probe, from the center of the closest signal outwards in a circular pattern
-Probe strike = victim location. LEAVE PROBE IN PLACE!
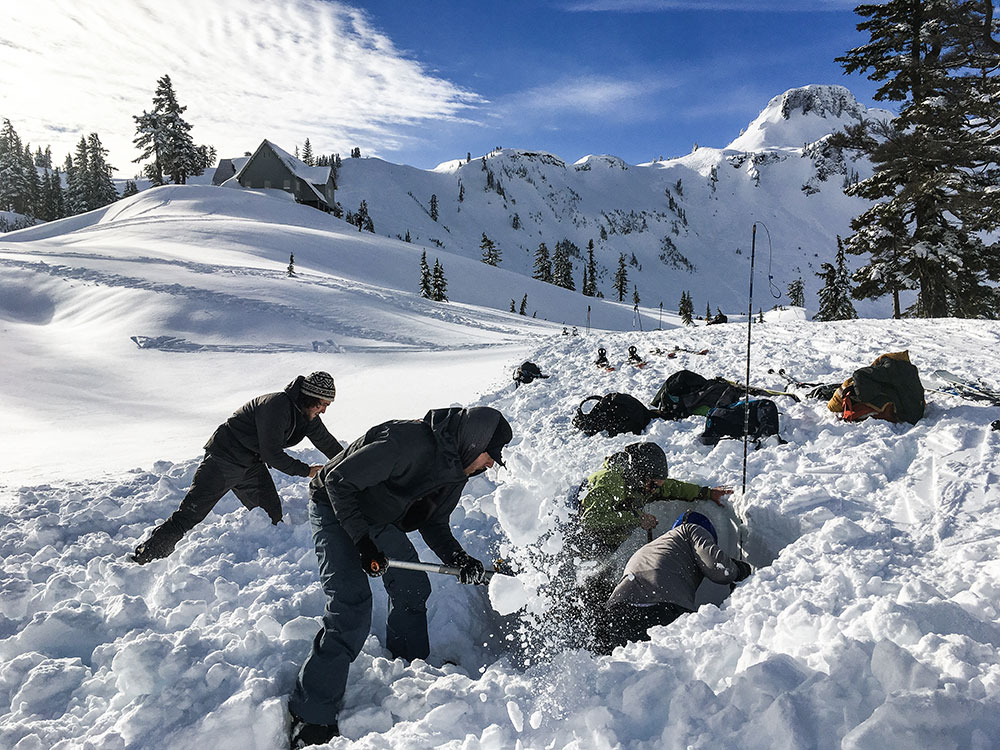
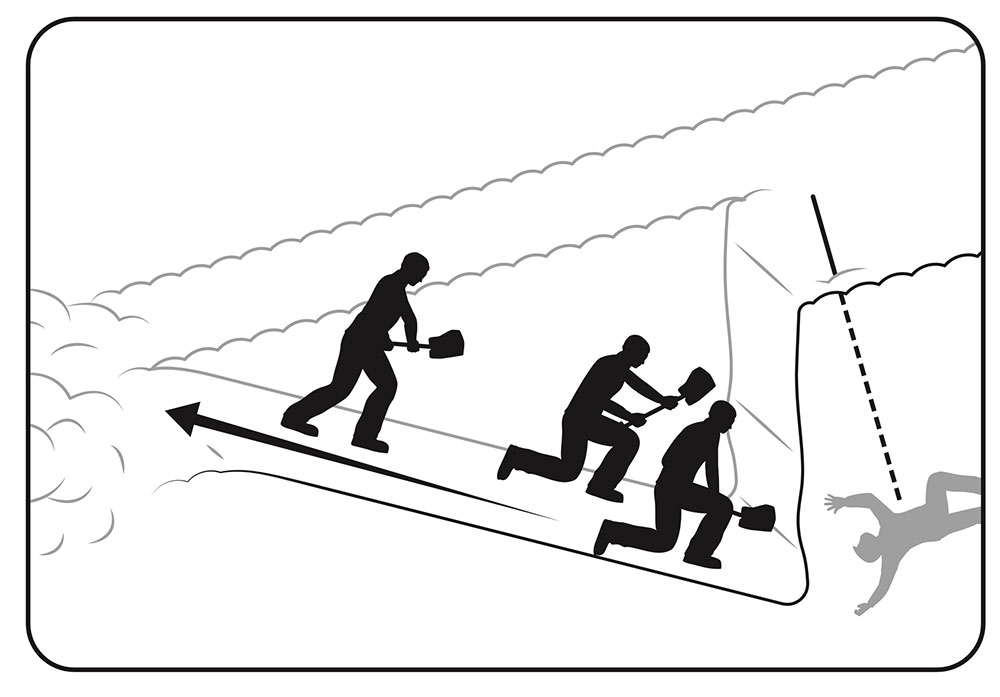
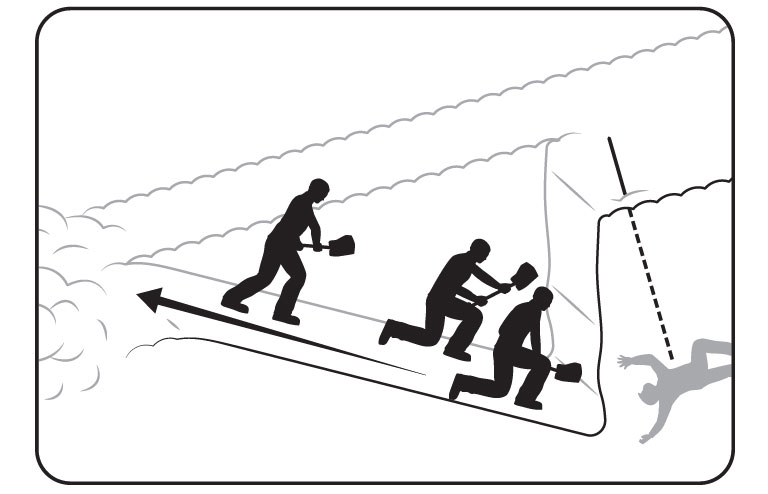
Step 11. SHOVEL FAST AND EFFECTIVELY
-Start with a large step downhill and away from the probe, 2 or more steps if deep burial
-Dig towards the probe; throw snow far away
-CHANGE SHOVELERS OFTEN (if other available)
-Careful shoveling as you reach your buried companion
-Expose face immediately in order to get airway
Learn more about Strategic Shoveling Techniques.
Step 12. PATIENT CARE
-Clear airway
-Provide First Aid or CPR as required
-Move to safe terrain
-Plan evacuation and follow up on call for help
Consider taking a Wilderness First Aid or Wilderness First Responder Course.
IF HELICOPTER COMES TO YOUR AID
-Secure loose items so they do not blow away
-When heli lands, wait for rescuer to come to you
Summary
It takes a lot of practice to get good at rescue and, even once mastered, is a perishable skill. Stay fresh on the most up to date practices and advances in the industry by taking an Avalanche Rescue Course at least every other year. Below is a great video put out by BCA that summarizes beacon searching well. Skip to 2:34 to get the most useful info.
Want to learn more? Check out our Ultimate Guide to Backcountry Skiing.
Strategic Shoveling
for Avalanche Rescue
Strategic Shoveling for Avalanche Rescue
The average burial depth in an avalanche is around 1.3 meters, which equates to about 1-1.5 tons of snow to move in order to extricate someone from avalanche debris. That’s just on average, in reality, someone could be buried much deeper. How long can someone survive under the snow? On average, if you get someone out in the first 15 minutes, they have a 92% chance of survival as long as they are not dealing with any major trauma. After that… the numbers are bleak. Survival rates drop to 37% after 35 minutes.
Over the years, From 1977-2000, the mean rescue time for recreationists (this includes beacon search) was 29 minutes. From 2000-2006, with the increase in avalanche education and more refined strategic shoveling techniques, the mean rescue time for recreationists decreased to 18 minutes. Research shows that the best way to decrease rescue times and overall mortality rates is to decrease the time spent in the shoveling phase, so let’s get into it.
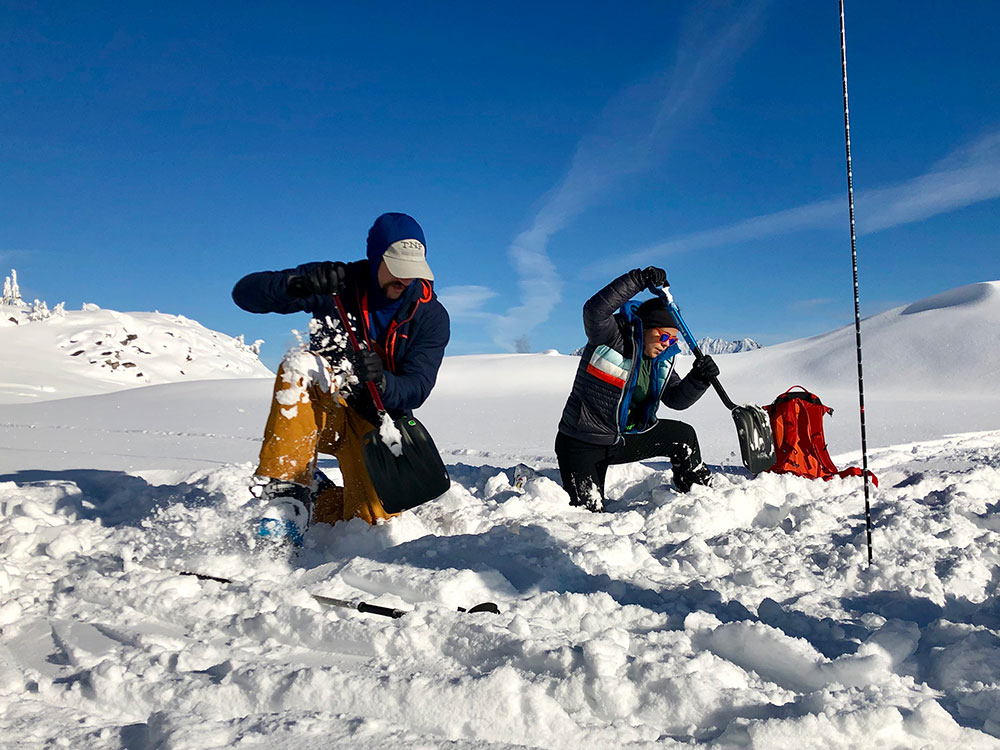
Strategic Shoveling Techniques
Be Proactive
I would be remiss to not remind you all that the best way to survive an avalanche is to be proactive and not get caught in one to begin with. Take an Avalanche Course and get the education to avoid needing your shovel for anything but training weight. Then, since this post is geared towards just the shoveling aspect of a rescue, make sure that you understand Single Burial Avalanche Rescue techniques and how to use your Avalanche Beacon and probe to pinpoint a buried person’s location.
Shoveling 101: The ABCs
Once you’ve pinpointed a buried individual with a probe strike, the ABC’s tell you where to start digging.
Airway: Start digging downhill of the probe strike (and avoid standing on or above the probe) to preserve the airway of the buried individual.
Burial Depth: The burial depth tells you how far downhill you need to be before digging in towards the probe. The general rule is 1.5x the burial depth found on your probe, but moving one step downhill for a 1 meter or less burial and 2 steps downhill for anything greater than 2 meters is easier to remember and just as effective.
Clearing Snow: Ideally, you’ll clear snow downhill and to the sides by either chopping or paddling (depending on conditions) in order to create a platform 1-2 meters wide nearest your victim and 2 meters wide at the back like in the diagram below. This allows you to have space to provide first aid after excavating the victim. To achieve this platform efficiently, start by clearing snow to the sides. This keeps the downhill side from building up with a lot of snow — preserving it for snow removal later once the hole is deeper. Once the hole is deep enough that lifting snow up and over the sides is inefficient and tiring, paddle snow downhill and to the sides.
Single Rescuer
If you’re alone doing a rescue, that’s a huge bummer. This means you’re doing all the lifting (quite literally). Keep the ABCs in mind as you dig. Start downhill, and move snow downhill and to the sides as efficiently as possible. You’re still aiming to get the slightly angled platform above.
Conveyor Belt
With more rescuers, the more resources you have, but using those rescuers efficiently can be a challenge. A simple method to keep folks organized is the conveyor belt method. This works best with four or more rescuers. The video below demonstrates the method. Take note: partway through the video a fifth person shows up and violates the “A” of the ABCs by standing on top of the victim. Don’t do this.
Below is another video of the conveyor belt method. This time with 10 rescuers.
To Summarize…
Time is against you in an avalanche rescue, so efficiency is key. In order to get more efficient at strategic shoveling takes practice that can’t come from reading about it. So take an Avalanche Course. There you will learn how to best practice rescue on your own so you can build good habits. Hopefully you’ll never have to perform an actual avalanche rescue, but prepare for the worst. Below is one more video from BCA that does a pretty good job of reviewing most these concepts. Stay safe out there!
Want to learn more? Check out our Ultimate Guide to Backcountry Skiing.
Winter Backcountry Trail Etiquette
The 10 Commandments of Winter Backcountry Trail Etiquette
Say you’re going up an established skin track and a group of bandit snow-shoers are descending upon you like an unruly pack of cackling cayotes clutching White Claws. Who has the right of way? How can you engage with other backcountry users in a respectful way that benefits everyone? This guide provides travelers with 10 rules of backcountry trail etiquette in the winter so you can make respectful and responsible decisions.
Skin Track vs Boot Pack
“1. Thou Shalt Not Walk in the Skin Track.”
This is one of the most commonly broken rules in the backcountry during the winter. There’s not much more frustrating as a skier or splitboarder than having a beautifully sculpted skin track plunge stepped out by someone post-holing — especially in snowshoes. Yes, it’s easier to walk in the skin track than break your own trail, but the person that created the skin track worked hard to make that track and someone walking in it destroys that work. Instead, break your own trail!
Putting In The Track
“2. Thou Shalt Not Create a Track That is Dangerous or Dumb.”
Up tracks should be put in a place that is out of avalanche terrain. Exceptions to this being when you’re climbing a steep couloir or other objectives that you’ve hopefully evaluated carefully. For skiers and riders, don’t make the skin track too steep. Doing so forces those behind you to create their own track — eating up more of the precious pow you hope to ride. Also, the track should ideally not go up the gut of the down track, or run you plan to ski/ride.
Use Established Trails
“3. Thou Shalt Use the Existing Track Unless it is Dangerous or Dumb.”
It’s common and desirable for skiers and riders to utilize the same skin track multiple times in a day. If a skin track is destroyed by post-holing or folks riding over it, then the skiers and riders must create a new skin track. In crowded multi-use zones like the Baker Backcountry going up to Artist Point, it’s common to see a dozen different tracks going across a slope. In a perfect world, there should be three tracks in areas like this: A skin track, an up-track for booting/snowshoes, and a down-track for booting/snowshoes. Use the existing track unless it conflicts with the two previous rules.
Right of Way
“4. Thou Shalt Yield to Uphill Travelers.”
Uphill has the right of way. Stand aside for those coming up the track so they don’t lose their momentum. Of course, some folks will decide to take a break and love to use folks coming down as an excuse to take a breather. Great, but make the assumption that folks want to keep walking up, step to the side, and communicate.
Be Nice
“5. Thou Shalt Play Well With Others.”
An often overlooked part of Leave No Trace is: Respect Other Users. The backcountry is increasingly a crowded place in the winter. Snowmobiles, climbers, hikers, and backcountry skiers/riders might all be using the same terrain for different purposes. No one has more of a right to the land than anybody else. So be nice. If folks are breaking the above rules, don’t freak out on them, they likely just don’t know. Instead, take the time to ask them how their day is going, build a little rapport, then, if it feels right, educate them politely.
Dogs In The Backcountry
“6. Thou Shalt Use a Leash”
Unless you are in a designated leash off zone, keep your canine companion leashed at all times. You may love your dog, but don’t assume everyone does. In addition, any wildlife you’d encounter definitely won’t like your dog and the added stress it provides.
Waste In The Backcountry
“7. Thou Shalt Pick Up Poop and Trash”
No one likes coming across poop when they’re outside trying to get away from the poop in their everyday life. Pick it up, bag it, and pack it out if it’s yours or your canine companion. The same goes for garbage like candy wrappers.
Trail Closures
“8. Thou Shalt Respect Trail Closures”
If a trail or area is closed, respect the closure. In the winter, the Department of Transportation, ski patrol at ski areas, and mechanized backcountry skiing/riding operations routinely close areas for avalanche mitigation or put up barriers to keep you out of hazardous terrain. Don’t get caught in a slide because you ducked a rope.
Wildlife
“9. Thou Shalt Not Feed The Wildlife”
As cute as they are, and as cool as the picture would be, don’t feed the animals. Animals have their own survival methods in the winter evolved over thousands of years. They don’t need you to feed them your raisins, in fact, you might just be killing them by doing so. If animals learn that humans are a food source, they will abandon their normal foraging behaviors for the easier handouts humans provide. Once an animal is dependent on humans for food, they get increasingly aggressive towards humans. Respect wildlife by keeping your distance.
Emergencies
“10. Thou Shalt Help In An Emergency”
If you witness an avalanche or medical emergency in the backcountry, provide aid as long as it is safe for you to do so. If responding to an avalanche burial, this means paying attention to hang fire or parts of the slope that could still slide. Don’t become a victim yourself. Even if you don’t have a bunch of knowledge, offer to help and ask what you can do.
Want to learn more? Check out our Ultimate Guide to Backcountry Skiing.
Never Miss A Post
Get blog updates sent to your inbox.